ScrollView에 CardView 여러개 추가하기
<ScrollView
	android:layout_width="match_parent"
	android:layout_height="0dp"
	android:orientation="vertical"
	android:id="@+id/root_layout">
</ScrollView>
🔼 무작정 ScrollView에 CardView 여러개를 욱여넣으면
java.lang.IllegalStateException: ScrollView can host only one direct child
라는 에러가 뜨게 된다.
처음엔 당황스러웠는데 곰곰이 생각해보니 답이 쉽게 나왔다.
'one direct child만 host 할 수 있다고?
그럼 추가하고자 하는 모든 cardview들을 하나로 묶어서(?) 하나의 child로 만들어버리면 되지 않을까?'
<LinearLayout
	android:layout_width="match_parent"
	android:layout_height="0dp"
	android:orientation="vertical">
	<ScrollView
    		android:layout_width="match_parent"
    		android:layout_height="match_parent">
    		<LinearLayout
        		android:id="@+id/root_layout"
        		android:layout_width="match_parent"
        		android:layout_height="wrap_content"
        		android:orientation="vertical"
        		android:padding="16dp">
    		</LinearLayout>
	</ScrollView>
</LinearLayout>
🔼 LinearLayout 안에 ScrollView 배치, 그리고 그 안에 LinearLayout.
root_layout에 CardView를 계속 넣어주다보면 스크롤바가 생김.
간단하게 해결!

동적으로 CardView 추가하기
추천 식당 리스트를 보여주는 기능을 만들 차례.
화면을 반 나눠서 위에는 지도, 아래 부분에는 식당 정보를 담은 리스트를 보여줄 계획이었기 때문에
리스트의 모든 정보를 다 보여주기 위해서는 ScrollView가 필수였다.
XD에서 구상했던대로 구현하려면 ScrollView에 CardView 여러개를 배치하면 될 거라고 생각했다.
근데 생각해보니까 추천할 식당 수가 고정돼있지 않네...
사용자의 위치, 메뉴에 따라서 추천할 식당이 하나밖에 없을 수도 있는데
미리 여러개의 카드뷰를 포함한 레이아웃을 만들어놓기가 애매했다.
그래서 추천 식당 가짓수에 따라 CardView를 동적으로 생성해서 배치하기로 했다.
이걸 어떻게 하나 했는데, 찾아보니 다 방법이 있더라.
1. Layout
activity_menuapproval.xml
<LinearLayout
	android:layout_width="match_parent"
	android:layout_height="0dp"
	android:orientation="vertical">
	<ScrollView
    		android:layout_width="match_parent"
    		android:layout_height="match_parent">
    		<LinearLayout
        		android:id="@+id/root_layout"
        		android:layout_width="match_parent"
        		android:layout_height="wrap_content"
        		android:orientation="vertical"
        		android:padding="16dp">
    		</LinearLayout>
	</ScrollView>
</LinearLayout>
2. Activity
import android.graphics.Color
import androidx.appcompat.app.AppCompatActivity
import android.os.Bundle
import android.view.ViewGroup
import android.widget.LinearLayout
import androidx.cardview.widget.CardView
import android.widget.RelativeLayout
import android.widget.TextView
import android.widget.Toast
import kotlinx.android.synthetic.main.activity_menuapproval.*

class MenuApproval : AppCompatActivity() {

    override fun onCreate(savedInstanceState: Bundle?) {
        super.onCreate(savedInstanceState)
        setContentView(R.layout.activity_menuapproval)

        // ...

        for(i: Int in 1..5) {
            // Initialize a new LayoutParams instance, CardView width and height
            val layoutParams = RelativeLayout.LayoutParams(
                ViewGroup.LayoutParams.MATCH_PARENT, // CardView width
                ViewGroup.LayoutParams.WRAP_CONTENT // CardView height
            )

            layoutParams.setMargins(16,16,16,50)

            // Initialize a new CardView instance
            val menuCardView = CardView(this)

            // Set bottom margin for card view
            //layoutParams.bottomMargin = 50

            // Set the card view layout params
            menuCardView.layoutParams = layoutParams

            // Set the card view corner radius
            menuCardView.radius = 12F

            // Set the card view content padding
            menuCardView.setContentPadding(25,25,25,25)

            // Set the card view background color
            menuCardView.setCardBackgroundColor(Color.LTGRAY)

            // Set card view elevation
            menuCardView.cardElevation = 8F

            // Set card view maximum elevation
            menuCardView.maxCardElevation = 12F

            // Set a click listener for card view
            menuCardView.setOnClickListener{
                Toast.makeText(
                    applicationContext,
                    "식당 상세보기",
                    Toast.LENGTH_SHORT).show()
            }

            // Add LinearLayout to the CardView
            menuCardView.addView(generateCardView())

            // Finally, add the CardView in root layout
            root_layout.addView(menuCardView)
        }
    }

    // Custom method to generate an image view
    private fun generateCardView(): LinearLayout {

        val cardLinearLayout = LinearLayout(this)
        cardLinearLayout.orientation = LinearLayout.VERTICAL

        val restaurantName = TextView(this)
        restaurantName.text = "파스쿠찌 잠실역점"
        restaurantName.textSize = 24f
        restaurantName.setTextColor(Color.WHITE)

        val restaurantNumber = TextView(this)
        restaurantNumber.text = "02-000-0000"
        restaurantNumber.textSize = 17f
        restaurantNumber.setTextColor(Color.WHITE)

        val restaurantAddress = TextView(this)
        restaurantAddress.text = "잠실역 7번출구 300m"
        restaurantAddress.textSize = 17f
        restaurantAddress.setTextColor(Color.WHITE)

        cardLinearLayout.addView(restaurantName)
        cardLinearLayout.addView(restaurantNumber)
        cardLinearLayout.addView(restaurantAddress)

        return cardLinearLayout
    }
}
이렇게 하면 결과는 아래와 같다.
각 카드의 정보를 달리하고 싶으면 인덱싱된 데이터를 불러와서 각각의 정보를 넣어주면 될 것이다.
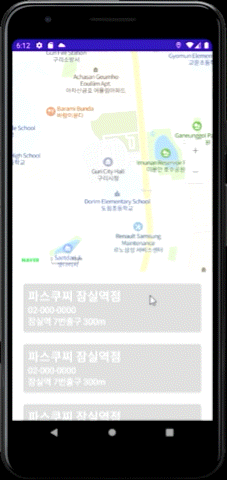
하지만 생각만큼 잘 안 돼서 일단은 5개의 식당만을 한정적으로 보여주기로 결정했다...
참고자료
https://www.appsdeveloperblog.com/cardview-in-kotlin-programmatically/
https://android--code.blogspot.com/2018/02/android-kotlin-create-cardview.html
❤와 댓글은 큰 힘이 됩니다. 감사합니다 :-)
'Devlog > Android' 카테고리의 다른 글
| [Android: Kotlin] ViewPager로 fragment 스와이프 - 옆으로 밀어서 넘기는 단일문항 설문지 기능 구현하기 (0) | 2021.10.02 |
|---|---|
| [Android: Kotlin] Bottom Navigation (화면 맨 아래 탭 기능) 구현하기 (0) | 2021.09.06 |
| [Android] 폴더 생성해서 프로젝트 구조 깔끔하게 정리하기 (0) | 2021.08.29 |
| [Android] 자주 쓰는 안드로이드 스튜디오 단축키 (0) | 2021.07.01 |
| [Android] Emulator 문제 해결방법 (0) | 2021.06.29 |